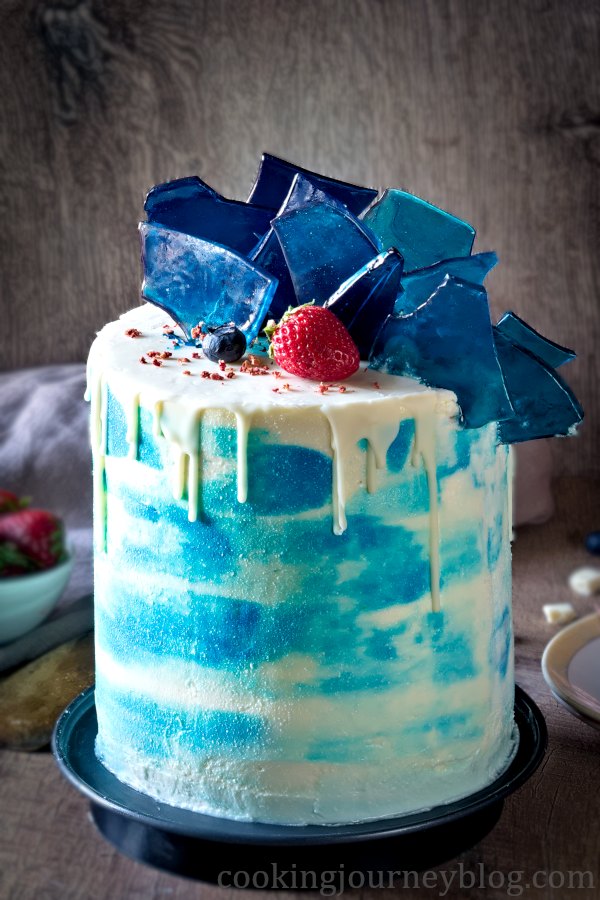
Vanilla cake recipe that makes an Ultimate Birthday cake for men! Classic vanilla cake with vanilla cream and blueberries inside, vanilla cream cheese frosting and edible glass decoration.
This vanilla cake is a hit for any Birthday or Wedding! Simple and delicious flavors, modern cake decoration.
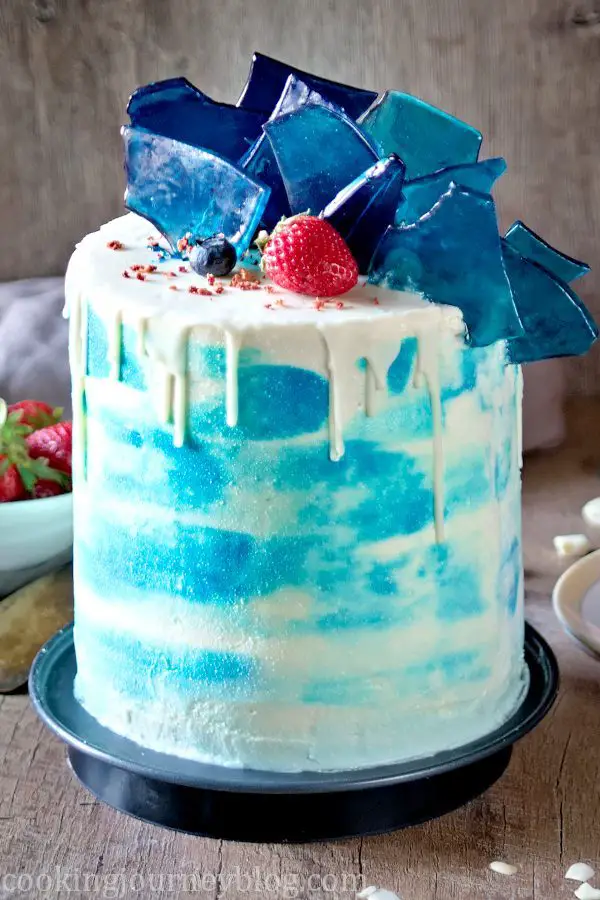
This sky blue cake is so tall! All cake layers are filled with vanilla flavor. Decorated with edible blue glass that looks beautiful and glows under the light.
It was blue cake design idea for his birthday. So I’ve made this gorgeous cake for him that he loved! First we wanted to decorate it with white chocolate, but then decided to play around with sugar.
Why you need to make this vanilla cake recipe
You don’t need to make this huge sky blue cake, but you need to try this best vanilla cake recipe! Make 2 layers of vanilla sponge, fill with vanilla cream and add some fresh seasonal berries like blueberries and strawberries. Easy summer cake recipe!
It’s all about vanilla, but you don’t want it to be overwhelming. I used vanilla extract in the cake and dry vanilla flavoring for the frosting. You can use vanilla extract instead of flavoring, too.
Start your cake 3 days ahead of time. Here is the plan:
- Make vanilla cake sponges and cool them completely.
- Make vanilla cream filling and assemble the cake. Frost the cake. Prepare edible glass.
- Decorate the cake with white chocolate glaze, edible glass and berries.
Making cakes from scratch takes some time, but it so much fun. Amaze your guests with this beautiful sky blue cake!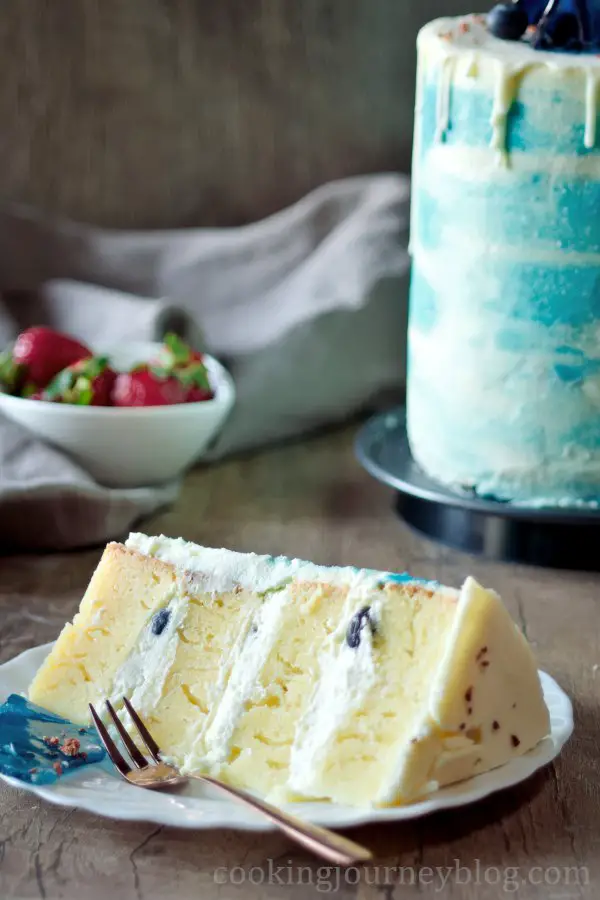
How to make vanilla cake from scratch
This recipe makes 4 thick vanilla cake sponges. You can half the recipe and make 2 sponges for a smaller cake or cut the sponges in half. I preferred the thick layers.
This vanilla cake holds the amount of frosting and cream really well!
I baked 4 cakes in 2 batches, using my 6 inch or 16 cm cake pans, greased and layered with parchment paper. You can also use 8 inch or 20 cm cake pans for this recipe, so the sponges will be slightly thinner, but really nice, too.
However, if you bake a bigger sponge, make sure to have some extra frosting.
Before making the cake, leave the eggs and butter for a couple hours on your kitchen table. You will need room temperature eggs and soft butter, cut in cubes.
Preheat the oven to 350 F / 180 C.
So to make this delicious vanilla cake you need to whip eggs with milk and vanila extract until double in size. I highly recommend using electric mixer.
Then find the huge bowl that you have in your kitchen. Sieve cake flour with
In a separate very huge bowl, sieve cake flour with baking powder. Add sugar and combine all these dry ingredients with a fork.
By the way, baking powder lightens the texture of the cake and helps it to rise. So don’t miss this ingredient! No baking soda needed, just use baking powder.
I didn’t try making this cake with regular flour. Cake flour makes a better sponge, more fluffy and beautiful. This should be gorgeous Birthday cake, so better find cake flour in your store or order online.
Add cubed butter to the dry ingredients, incorporating it in few batches. You can use the fork or set an electric mixer on a low speed, so that there is less cake flour on you!
After that you just pour wet ingredients in the flour and butter mix. Electric mixer will do the work to make a smooth batter.
Distribute batter to four parts to make four vanilla cake sponges. Bake in a preheated oven. Check if it’s ready with the wooden skewer – it should come out clean.
It is crucial that you set aside your vanilla cake to cool completely. Let them cool in a pan for half an hour, then transfer to the cooling rack. Trim the tops and bottoms of each cake with serrated knife or cake leveler. This will make your cake layers even.
These trimmed vanilla cake recipe leftovers are so delicious we’ve eaten all of them as that! But you can also freeze them and use in trifles (instead of biscuits), cake pops or whatever you like.
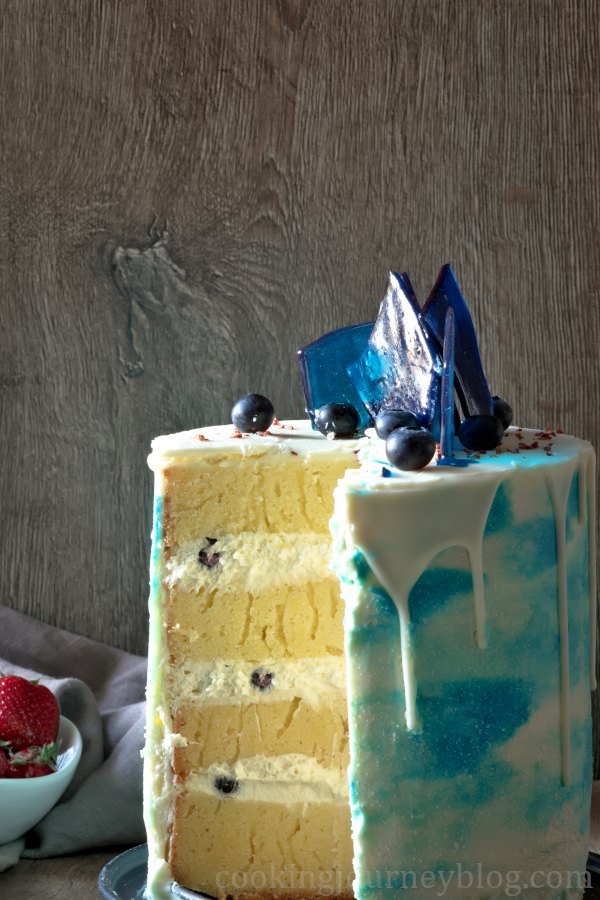
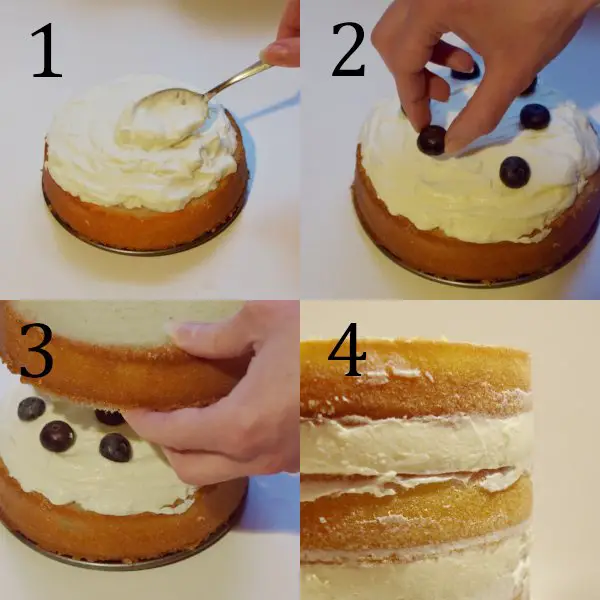
I used store-bought Vanilla cake cream powder to make the filling. It is easy to make and tastes good! According to instructions I’ve whipped milk with powder. Then instead of adding the butter I’ve mixed twice as much cream cheese to make it lighter. Assemble the cake as shown on the picture below and let the cream fully set in the fridge, while you’re making the frosting.
How to make vanilla cake frosting
Let’s start with confession. I don’t like vanilla buttercream. That is why I always make cream cheese frosting for cakes. It is softer and much more delicious to my taste!
So first start whipping the butter until it is white and doubled in size. Butter ensures the frosting won’t fall apart. Sieve in icing sugar and use your muscular electric mixer to combine. You can use your stand mixer as well.
In the end add cream cheese and whip on a slow speed just until combined. Don’t over-beat, because the cream cheese frosting may split! If you’re unsure, better mix in the cream cheese with a spatula.
Store frosting covered with the cling film or plastic wrap. If you forget about it, the frosting will have a crust and you will need to start again. Also mix with the spoon before applying to the cake.
If your frosting becomes too runny, pop it in the fridge for 15-30 minutes.
It is good to have some leftover cream cheese frosting, in case someone sticks the finger, while transferring the cake. You know, I’ve been there! But it can easily be fixed.
How to frost the cake
Now you have white frosting and half a cup of it you colored sky blue. Start frosting the cake. To make a first coating, generously spread white frosting around the cake. Using cake scraper under the small angle to the cake, rotate it and make the sides smooth. From time to time, scrape the leftover frosting off to the bowl. Smooth the top of the cake with an off-set spatula.
The first coating helps to stick crumbs and makes the cake ready for second coating. Leave it in the fridge for at least one hour.
Then apply another coating until you have smooth white cake. Add dots of blue frosting around the cake and run the cake scraper around the cake. If some spots are too blue, you can add dots of white frosting and smooth with a cake scraper.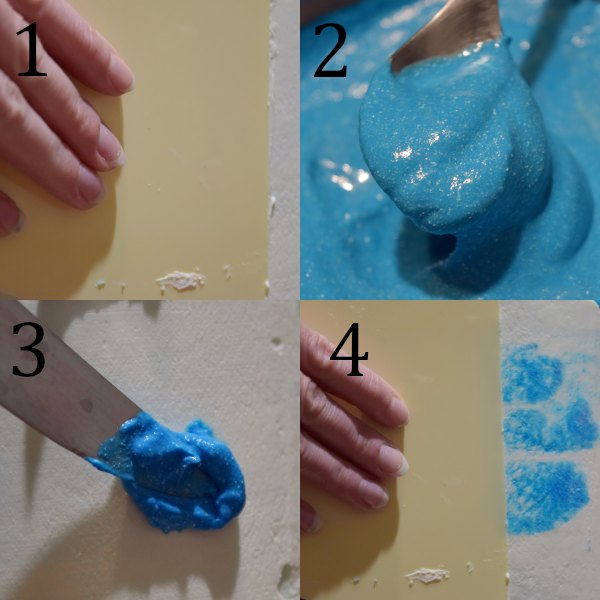
How to make edible glass for Birthday Cake decoration
This is so much fun! But you should be cautious, working with hot sugar. And you will also need food or candy thermometer. Oh, and always use kitchen scales to be precise and be confident that you’re doing it right.
Before making the edible glass, prepare 2 flat trays. I used sheet pans, layered with parchment paper and greased with butter. This will prevent sugar from sticking to the tray. Store in in the paper, too!
Making edible glass is pretty simple. Just combine sugar, glucose and water in a heavy bottom pot. Put it on a low heat and wait until the thermometer shows you 302 F / 151 C.
Immediately remove from hit and add blue gel coloring. Mix with a spoon fast and pour on the prepared tray. I poured half blue and than added more coloring to the pot to mix and pour on the other tray. This made two colored glass. But you can stick to one color!
It hardens almost at once. Wait couple minutes, than try to break it with your fingers into decorating shapes. If you wait longer, it will be possible to break only with a hammer or rolling tin, but then it will break into smaller pieces. Moreover, it will be harder to make a desired shape.
Be careful, as some pieces are sharp!
Great news that you will have some leftover edible glass that you can enjoy, when you need a candy! The tastes reminds me of the childhood…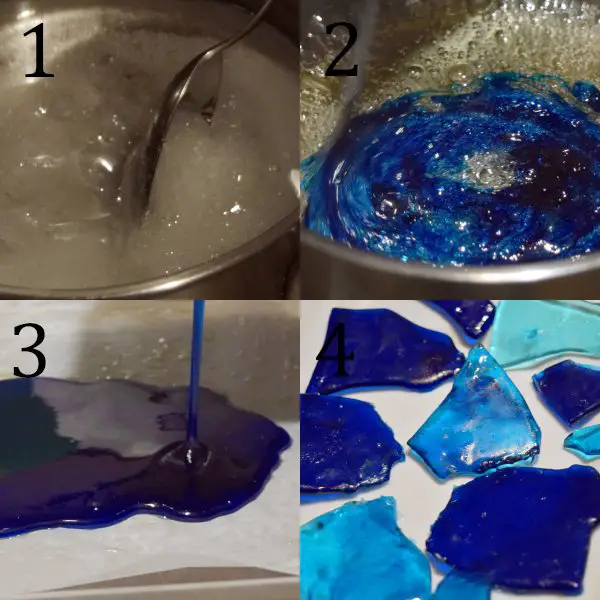
Equipment and supplies that you need to make this vanilla cake recipe:
- Oven. Ha, didn’t expect that?
- Electric hand or stand mixer with whisk attachments
- 2 or 4 cake pans (6 inch or 16 cm); you can also use 8 inch /20 cm pans
- 2 flat trays or sheet pans to transfer liquid sugar
- Parchment paper for baking sponges and making edible glass
- Cake turn-able or Lazy Susan. It will be so much easier to frost the cake!
- Cake scraper with the side as high as your cake to frost it
- Off-set spatula to apply the frosting and smooth the top of the cake
- Serrated knife or cake leveler
I hope you will enjoy this Birthday vanilla cake recipe! This cake serves from 6 to 8 people depending on its size. Store the cake in the fridge up to 6 days.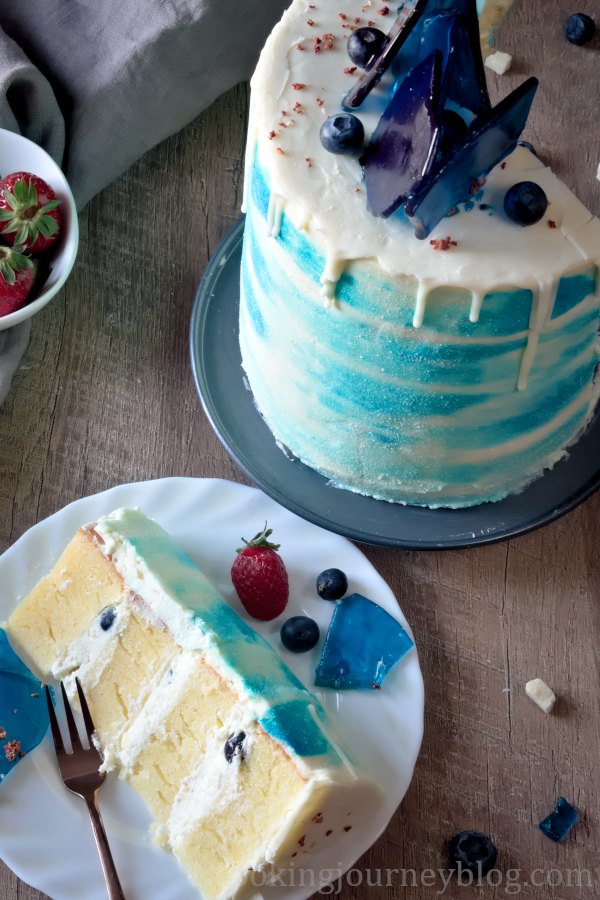
Check our other Birthday cake ideas:
- Chocolate Cherry Layer Cake Recipe
- Peach Cake with Cream Cheese Frosting – 2 Tier Cake
- Vegan Chocolate Cake
If you like this vanilla cake recipe, please share it on one of your social media!
For more delicious ideas follow us on Pinterest , Facebook , Twitter or Instagram .
Vanilla Blueberry Cake
- 2 x 6 inch or 16 cm cake pans if you bake in 2 batches or 4 tins if you bake at once
- parchment paper and cling film
- Oven
- small heavy bottom pot
- 2 flat trays
- stand or hand mixer with whisk attachment
- huge bowls for mixing
- spatulas, spoons
- cake scraper
- sieve
- serrated knife
- rotating cake stand
- food or candy thermometer
- 675 g unsalted butter cubed (room temperature)
- 12 eggs M (room temperature)
- 375 ml milk room temperature
- 6 tsp baking powder
- 300 g sugar
- 675 g cake flour
- 1 tbsp vanilla extract
- 120 g vanilla cake cream powder*
- 300 ml milk
- 200 g cream cheese
- 50 g fresh blueberries
- 150 g butter unsalted (room temperature)
- 150 g icing sugar
- 800 g cream cheese
- 1 tbsp dry vanilla flavoring or extract
- blue gel coloring
- 2 tsp vegetable oil
- 300 g sugar
- 200 g glucose syrup
- 75 g water
- blue gel coloring
- 100 g white chocolate glaze**
- 1 strawberry
- 1 tbsp blueberries
- 1 tsp dried crushed strawberries
- Preheat oven to 350 F / 180 C
- Prepare cake pans. Put the baking paper on the bottom and grease the sides with butter.
- In a big bowl whip eggs with milk and vanilla for 5 minutes until doubled. Use electric mixer with whisk attachments.12 eggs, 375 ml milk, 1 tbsp vanilla extract
- In a separate very huge bowl, sieve cake flour with baking powder, add sugar. Combine with a fork.6 tsp baking powder, 675 g cake flour, 300 g sugar
- Add few butter cubes in flour mix and push with the fork. Incorporate butter cubes in batches, mixing with the fork until you have sand-like mixture. You can also use hand mixer on a slowest speed.675 g unsalted butter
- Add wet ingredient in 3 batches, mixing with electric mixer until well combined.
- Distribute the batter to 4 cake tins (or divide in 4 parts if you bake in 2 batches).
- Bake cake sponges 40 minutes, until inserted wooden skewer comes out clean or with few crumbs. Bake another batch until you have 4 cake sponges ready.
- Let the cakes cool for 30 minutes in the pans, then remove from the pans and let them cool completely overnight.
- With the serrated knife trim the bottoms and tops of each cake sponge to make them even.
- Follow the cake cream package instructions. Mine was to whip milk with powder for 5 minutes, then add butter and whip again. Instead of butter I whipped the cream with cream cheese to make it lighter.120 g vanilla cake cream powder*, 200 g cream cheese, 300 ml milk
- Put the cake on rotating cake stand.
- Put a generous amount of vanilla cream on top, smooth with the spatula. Sprinkle some blueberries on top, but not too close to the end of the sponge.50 g fresh blueberries
- Put another sponge on top and repeat until you put the last sponge. Make sure your cake looks even from every side. Remove excess cream from the sides, if needed.
- Whip the butter for 5 minutes until white and double in size. Sieve half of icing sugar and continue whipping. Sieve remaining icing sugar and vanilla. Whip until incorporated and sugar dissolved.150 g butter, 150 g icing sugar, 1 tbsp dry vanilla flavoring
- Add cream cheese and on a slow speed whip together just until combined.800 g cream cheese
- Set aside half cup of frosting and add blue coloring. Mix until it is well combined. Cover and leave in the fridge.blue gel coloring
- Start frosting the cake. Generously add frosting to the sides of the cake. Hold the cake scraper under the small angle in one hand and rotate the cake stand with the other. Remove the excess frosting from the scraper (scrape on the sides of the bowl).
- Add frosting on top of the cake and make the edges smooth with off-set spatula, moving from sides to the center of the cake. Make sure it has an even top.
- Leave the cake with first coating in the fridge for at least one hour. Cover the bowl with frosting with cling film and leave it in the fridge.
- Make a second coat for the cake until it is white and smooth. Add dots of blue frosting around the cake sides. Then make the cake smooth with scraper. You can add more blue frosting dots if needed and move the scraper around.
- Leave the cake overnight in the fridge or at least 3 hours.
- Prepare 2 flat trays, covered with parchment paper. Brush the paper with oil.2 tsp vegetable oil
- In a heavy bottom pot add sugar, glucose and water. Mix with the spoon just so the sugar is covered with water and glucose.300 g sugar, 200 g glucose syrup, 75 g water
- Put the pot on a low heat. Use the food or candy thermometer. Cook the sugar until bubbling and it starts changing color. It should reach 302 F / 150 C after 30-40 minutes
- Immediately remove from heat and add food coloring, mix fast. Pour half of mixture on a tray.blue gel coloring
- Add more food coloring to the pot, mix fast and pour on the other tray.
- Let it cool about 5 minutes. When it is still warm, start breaking it into approx. 2x2 inch (5x5 cm) pieces. Set aside to harden.
- Melt white chocolate glaze in a water bath or microwave. Pour white glaze on top of the cake, move it with spatula or spoon to the edges to make drips around the cake.100 g white chocolate glaze**
- Insert blue edible glass pieces in the top of the cake.
- Decorate with blueberries, strawberry and sprinkle dried strawberry pieces.1 strawberry, 1 tbsp blueberries, 1 tsp dried crushed strawberries


Hello. Any clue why mine came out very hard? I kept it in the fridge and next day was way to hard to eat it.
Hi Alina,
We’re sorry to hear that your cake turned out hard. Can you tell us what type of oven were used to bake the sponges in?
There also can be quite a few other reasons for this outcome.
For example, mixing too intensively can lead to excessive gluten development, which can affect firmness. On the other hand, insufficient stirring can lead to limited development of gluten, which can lead to a similar outcomes.
When using butter, it is important that it is soft when heated, but not hot or completely runny, and all the other ingredients should be room temprature.
As for the cake that you have already made (if there is still some left 🙂), in order to make it softer, you can try warming a piece for a few moments in the oven/microwave or soaking it in a little liquid, such as your favorite juice. We hope this helps 🙂
Wow!!! It looks delicious. I will make it for my fiance’s birthday to make them happy. thanks for sharing this recipe.
Hi Laurem! Let us know how you like it! We are sure it will be the centerpiece of the Birthday!
Thanks so much! This Birthday cake takes some time, but the result is absolutely worth it!
Great, thanks for sharing your feedback!
I love vanilla cake very much, tried this recipe at home.
Thanks for sharing such a delicious cake recipe.
Thanks for your feedback, Bindu!
This is really awesome and the way you wrote this article & recipe I just loved it. Thank You for sharing I’ll surely try this.
Thank you, Kirti!
WOW!! What a delicious cake.. My sister’s birthday is coming and i’ll definitely try this cake on her birthday.. I am sure she love it..
Thank you, I hope she’ll love this vanilla cake! Happy Birthday to her!
What a treat! So pretty and delicious!
Thank you! This vanilla cake recipe is a must-try!
Such a great classic vanilla cake! Your is beautiful!
Thanks so much, Krissy!
This Cake is to Gorgeous to Eat! I feel bad to cut into it. First world problems lol 🙂
Haha, thanks! This vanilla cake is so delicious, better have a slice!
What a gorgeous cake! This will actually be perfect for my sister’s baby shower next weekend; she’s having a boy!
Congrats! I think it is a great cake for baby shower for boy. Enjoy!
What a beautiful cake!! I love all of your step by step photos..I feel like a can tackle making this beauty.
Thanks so much! This Birthday cake takes some time, but the result is absolutely worth it!